Thursday, February 27, 2014
How To Use Blogging to Enhance A Lesson (and why)
Blogging can take a lecture-style lesson and turn it into a knowledge collaboration. Working together to collect and share information allows students to be active participants in their own education.
Blogs can allow for integration of several media sources. Links and graphics can add interest to the learning experience. Blogs are also great for peer to peer learning. See our video above for a complete over view of how blogging can serve as a great learning activity.
Wednesday, February 19, 2014
Designing A Blog As A Learning Activity In The World of Web 2.0

Today social media blogs have grown in numbers as educators address the new needs of students and the availability of web 2.0 tools. A well written blog can both communicate events and news, as well as as serve as a great educational tool. The use of blogs has shown to improve writing skills in students, while also providing the platform to learn about media literacy and the correct usage of the internet.
This learning exercise has been designed to educate on the uses of a blog as well as how the tools function in a blog environment. This exercise will take the viewer through each step of setting up a blog, how it functions and how each individual element serves a purpose in the process.
In the end you can publish your blog and enjoy its educational benefits to students
Things to remember in designing a blog:
• What do you want your blog to communicate?
• What types of helpful links will you include?
• Are all components helpful and neccessary ?
• Have you chosen a good design (colors and fonts)?
• Do you have interesting images to make the blog appealing?
• Have you credited all copy and images
"Our groups web 2.0 blog was originally designed not only to be a helpful learning exercise, showing the viewer how to design a blog site, it was also carefully planned and designed to show you how to select and use images, links, badges and copy, to make the blog look exciting and a place where a student or educator can find valuable and usable information. The links, RSS feeds, videos and content has been build around web 2.0 learning tools. Each piece of information is usable and can be linked to other projects. Our groups intent was to provide a realistic looking blog that can be used as a source of information on the changing world of web 2.0 and its many tools."
"Imagine just our current projects alone. If you build a blog you can post class assignments and graphic charts which may help others in the class. The KWHL chart is a great example of usable graphics to include on a classroom or informational blog, everything highlighted with updates and current posts."

Before starting
The learning exercise will run smoothly if you view the two YOUTUBE videos first and then follow the simply step by step directions below
Step 1.
Set up a google email account. create one now. If you have one already you can skip this step and go directly to the blogger home page. See below for step 2.

Step 2.
Create a blog
To start a blog with Blogger, visit the Blogger homepage, enter your username and password, and click Sign in. Enter a display name and accept Blogger's Terms of Service. Then click the Create a Blog link and get started!
Pick an address (URL) and a blog title. Then, choose your favorite blog template (this is how your blog will look when you publish it). Now get creative, add information to your personal profile, and customize how your blog looks, if you feel up to it. Start blogging now!
Dashboard
Your Dashboard, as always, is your starting point. This is where all your blogs are listed, and you can click on the icons next to them to perform various actions on each blog, such as:
- Writing a new post: Just click on the orange Pencil icon on your Dashboard to access the Post Editor.
- Viewing your posts: The gray Post List icon will take you to a list of your published and drafted posts for a specific blog.
- Catching up on your favorite blogs: Below the list of your own blogs, you’ll see a list of the blogs you follow with an excerpt from their latest posts.
- Everything else: Check out the drop-down menu next to the Post List icon for a quick link to:
- Overview
- Posts
- Pages
- Comments
- Stats
- Earnings
- Layout
- Template
- Settings
Note that the Earnings tab will only show if AdSense supports your language.
Overview
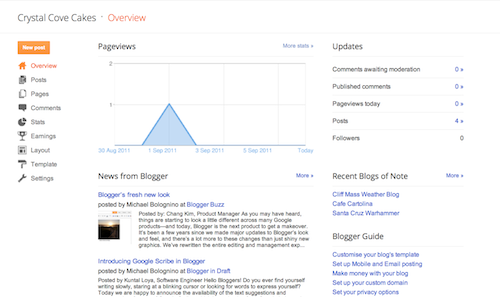
On the Overview tab, you can see your blog’s activity, news and tips from the Blogger team, and recent Blogs of Note.
Write your post
Once you've signed in to Blogger, you'll see your dashboard with your list of blogs. Here's what you need to do:
- Click the orange pencil icon to write a new post, and enter anything you want to share with the world.
- Next, you'll see the Post Editor page. Start by giving your post a title (optional), then enter the post itself:
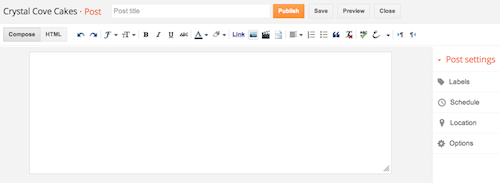
- When you're done, click the Preview button at the top to make sure it's ready to go, and then click the Publishbutton to publish your post.
Add an image
You can add an image from your computer or the Web to your blog. Click the image icon in the Post Editor toolbar. A window appears prompting you to browse for an image file on your computer, or enter the URL of an image on the Web.
Once you've selected your image, you can then choose a layout to determine how your image will appear in your post:
- The 'Left', 'Center', and 'Right' options allow you to customize the way your blog text will flow around your image.
- The 'Image size' options will determine how large the image will appear within your post.
Click UPLOAD IMAGES to add your image, and then click DONE when the notification window appears telling you that 'Your image has been added.' Blogger will then return you to the post editor, where you'll see your image ready to be published to your blog.
You can also publish images to your blog using your mobile device, Google's free photo software Picasa, or a third-party service like flickr.
Add a video
To add a video to your blog post, click the film strip icon in the Post Editor toolbar above where you compose your blog text. A window appears prompting you to 'Add a video to your blog post.'
Click Browse to select the video file from your computer that you'd like to upload. Note that Blogger accepts AVI, MPEG, QuickTime, Real and Windows Media files and that your video must be less than 100MB in size.
Before uploading your video, add a title in the 'Video Title' box and agree to the Terms and Conditions (you'll only have to do this the first time that you upload a video with Blogger). Then click UPLOAD VIDEO.
While your video uploads, you'll see a placeholder in the post editor showing where your video will appear. You'll also see a status message below the post editor letting you know that your upload is in progress. Depending on the size of your video, this usually takes about five minutes. When it is complete, your video will appear in the post editor.
Customize
Your template is a fun way to customize your blog. When creating a new blog, you're first asked to choose a default template, this is the basic design of your blog. You can choose from many templates for your blog; simply pick the one that best fits your needs.
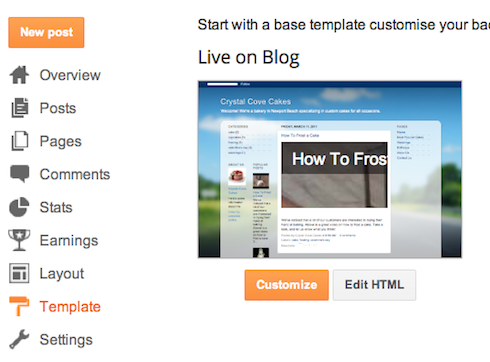
Once on the Template tab, you can either click on the orange Customize button to get started with our easy-to-use WYSIWYG (“What you see is what you get”) template designer, or choose one of our many default templates. If you’d like to edit the HTML of your blog, just click the gray Edit HTML button.
In addition, you can customize your blog's design using our intuitive drag-and-drop interface. You can also add powerful gadgets such as slideshows, user polls, or even AdSense ads. If you want more precise control over your blog's layout, you can also use the Edit HTML feature. To edit your blog's layout, follow these steps:- Click Layout from the drop-down menu on your dashboard below the blog you would like to customize.
- From there, click Edit to edit existing gadgets, or Add a Gadget to add new ones.
- To add a new gadget after you've clicked Add a Gadget, simply click the plus sign next to your desired gadget. You can choose from gadgets by category, or search for a specific gadget in the top right of the pop-up window.
- Make sure the gadgets chosen serves a purpose and not used to fill space.
- Once you've added the necessary information to your selected gadget, click the orange Save arrangement button. Your layout changes will appear instantly.
Privacy and permissions
By default, your blog is completely public, and can be read by anyone on the internet. However, if you want to keep it private, you can do that, too. You can change these settings on the Settings | Basic tab.
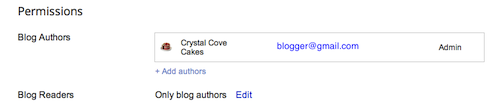
- Under the 'Blog Readers' section, you'll probably see 'Anybody' selected as the default. When you change this to 'Only these readers,' you'll get an Add Readers button.
- Click the Add Readers button and then enter the email address of a person to whom you'd like to grant access to your blog. To add multiple people, separate their addresses with commas.
- For each address entered, the Google Account associated with that address will be given access to view your blog. If an address is not associated with an account, that person will receive an invitation email with a link allowing them do one of three things:
- Sign in to an existing account.
- Create a new account.
- View your blog as a guest (no account required).
Copy and directional steps are copyrighted by Google and used for educational purposes only, no ownership is implied.
Subscribe to:
Posts (Atom)